
Introduction
Video mapping is a very promising technology for enhancing user immersion into new technologies. Multi projector systems can create an artificial 2D and 3D environments for new game experience and design. There are many video mapping solutions on the market and even more graphic engines to create those environments. The problem occurs when you need to connect those technologies to create a worthwhile experience for users. This post will introduce a possible solution for this problem using Unreal Engine 4 (graphical engine), GrandVJ XT (video mapping software) and Spout (a framework for streaming video from graphics engine to video mapping software).
Note
Unreal Engine 4 and GrandVJ XT was picked because of authors preference.
Many more software can utilize Spout, to name only Unity3D and Resolume Arena.
Possibilities
If you ask yourself “What can I use it for?” I can point you to the resulting application that was a foundation for this article:
Of course this article is only a mere beginning of the game production process. Nevertheless, power that video mapping can give your game is worth a few minutes of reading.
Prerequisites
Skill
Considering the power of Spout it is very easy to use after proper configuration. User needs to be able to install software on his own. Unreal Engine 4 knowledge will be useful but is not required.
Software
Spout
Although presented solution uses commercial software, both ends of the system (graphical engine and video mapping software) can be substituted by other suitable software as long as they can support the most important element – Spout – a free open source software for managing streams inside of Windows platform. Spout offers both sender and receiver functionality in multiple instances. We will use a single sender instance on the UE4 side and a single receiver on GrandVJ XT side (it doesn’t allow more Spout sources after all).
Spout SDK needs to be installed and every platform needs to be provided with suitable plugin.
GrandVJ XT has SpoutCam source out of the box. Unreal Engine 4 needs a little more work with obtaining and installing a suitable plugin. We will get to this shortly.
Spout SDK can be downloaded from here.
Unreal Engine
This tutorial uses commercial software, but it can be created without any cost. Unreal Engine 4 can be downloaded and used for free until project doesn’t generate profits.
Solution was tested on version 4.12.5.
You can obtain UE4 from official website.
GrandVJ XT
GrandVJ XT is available to download for free and can be used on a trial license.
Solution was tested on version 2.1.4.
It can be obtained from here.
Operating System
You will need a Windows 7 or higher (this solution uses Windows 8.1 Pro 64-bit, but it was also tested on Windows 10).
Example project
You can find the Unreal Engine 4 project here. You will need to run the SpoutPuzzleTest.uproject file to prepare the game to be run.
Hardware
Video mapping operates mainly on projectors, however the Spout configuration can be done using monitors. It should work with projectors without any changes (not considering tweaking the final view)
Configuration
At this moment you are ought to have installed Unreal Engine 4, Spout SDK and Grand VJ XT, and verified that all of them work (Spout SDK has a DEMO folder where you can use SpoutSender and SpoutReceiver to verify that it works).
Unreal Engine 4 Spout plugin installation
Next step is to install Spout plugin for UE4. I have encountered 2 potential plugins gathering state of the art. UE4ToSpout and Spout-UE4. Although UE4ToSpout looks far more professional and it even has an half of an hour long video that even concludes building Unreal Engine 4 from sources (good tutorial in this part though) it failed to work for me. I got only a single frame and later a black screen and couldn’t move forward. In contrary Spout-UE4 has little information on how to install it and of low quality. Altogether skill acquired using UE4ToSpout was very useful when installing Spout-UE4 so it worked finally.
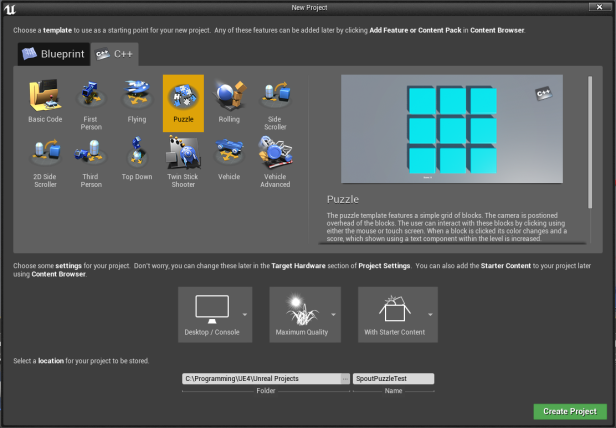
First we will need to create a basic project. Let us start with Puzzle Project which view we will try to lay on the floor using video mapping.
Open Unreal Engine 4 Editor, go to File -> New Project, select C++ tab and a Puzzle project. Let’s name it SpoutPuzzleTest.
Note
We will not use C++ in this tutorial, but it is easier to be prepared for it
rather than add it later, if you would like to go on with the project.
Before doing anything with the project let’s take care of the plugin part. From official repo download the project (you can clone repo using GIT, but it would be perfectly suitable to just download ZIP archive).
Extract the archive, rename the main folder to SpoutUE4 and copy it whole into (assuming that you created your project where I did):
C:\Programming\UE4\Unreal Projects\SpoutPuzzleTest\Plugins.
If Plugins folder doesn’t exist just create it.
Now close Unreal Editor. Go to C:\Programming\UE4\Unreal Projects\SpoutPuzzleTest and open SpoutPuzzleTest.uproject (it will restart the project).
Unreal Engine will ask to rebuild Spout plugin using current Engine. Just click Yes.

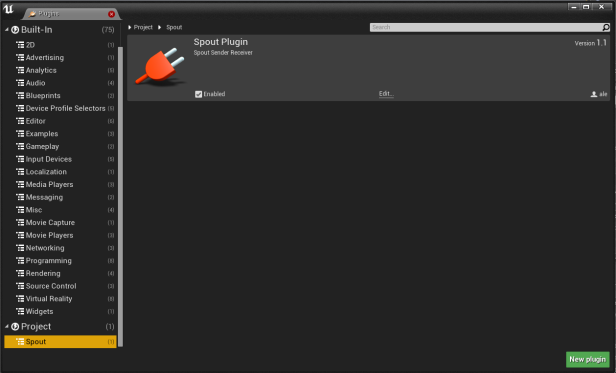
If it rebuilds properly your project will open as usual. Now check if Spout plugin is enabled. Go to Edit -> Plugins, scroll down to Spout plugin and make sure it states “Enabled“.
Utilizing SpoutSender
SpoutSender Function
SpoutSender is a Blueprint Function from SpoutPlugin that provides us the possibility to insert textures into the stream. It contains several parameters that need to be provided.

SpoutName is a name of the stream that Spout will later recognize as our stream.
SendTextureFrom is an Enum that states what is the source of the texture for stream. We will use TextureRenderTarget2D.
TextureRenderTarget2D is the texture source, which will be added to the stream.
Target Gamma is ommitable.
SpoutSender function puts a single frame into a stream. We need to do it multiple times every second so the stream is fluent. We will use an Event Tick for sending textures about 60 frames per second.
Creating SpoutSender Blueprint
To correctly manage our stream we need to create a Blueprint that will offer a interface for controlling source and state of SpoutSender.
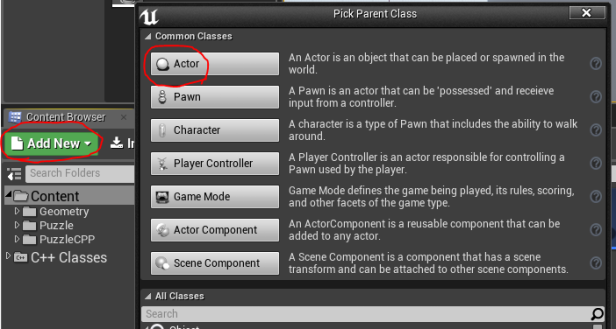
Let’s create a new Blueprint that inherits from Actor. Click Add New -> Blueprint Class and select Actor.
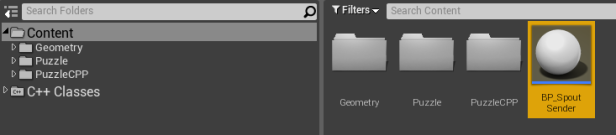
Put it into Content folder and name it BP_SpoutSender.
Now open BP_SpoutSender and select EventGraph.
First we need to create variables that will be exposed to other Blueprints (we will manage this BP_SpoutSender instance from LevelBlueprint).
Variables
Variables to be created are:
SpoutName of type Name – it will hold the name of our stream. You can hard code “SpoutPuzzleTest” here.
State of type ECheck Box State – it will tell us that stream is ready to be generated (after the level loads, etc.).
TextureRendererTarget2D of type Texture Renderer Target 2D – it will provide the stream with fresh textures.
SendTextureFrom of type ESpout Send Texture From – it will configure the type of source SpoutSender expects.
The Variables set should look like this:
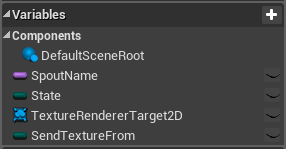
Note
DefaulsSceneRoot Component is added automatically to every Actor.
EventGraph
EventGraph needs to be configured as on the image below.

This is what happens here:
On every tick Actor checks if it is supposed to generate another frame (Switch on ECheckBoxState), next it invokes the SpoutSender function using variables that need to be configured by external source (i.e. LevelBluperint).
On the contrary stream is being closed (Close Sender) when Actor is being destroyed or game ends.
Putting SpoutSenderActor into the Scene
Finally we need to create an instance of BP_SpoutSender. Grab BP_SpoutSender and drag it into the Scene. Next change it’s name to SpoutSenderActor.
Creating a SceneCapture2D for SpoutSender
The next thing we need to do is to create an input for SpoutSender. This input is called SceneCapture2D. SceneCapture2D works similar to a simple camera but it stores what it points to into a texture. This texture can be later utilized as a frame in a stream.
Let’s add SceneCapture2D to the scene. Search for this class in the class search box and drag it into the scene.

And put it as a child of CameraActor named Camera, so it points to the same point as the camera.

Our new SceneCapture2D Actor is named SceneCapture2D1 as default and we will leave it this way.
Level Blueprint
Adding references to Actors
Now select SceneCapture2D1 and open Blueprints -> Open Level Blueprint.
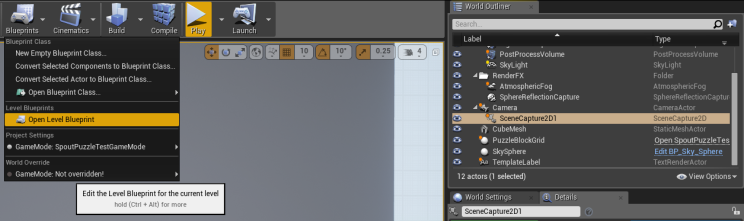
This way we will access a Level Blueprint, a Blueprint that has access to all Actors on the Scene. Being there click RMB (Right Mouse Button) on the grid and select Create a Reference to SceneCapture2D1.

This way we can later use SceneCapture2D1 captured frames.
Repeat the same process with SpoutSenderActor.
Creating logic
Puzzle template came with some logic in the LevelBlueprint.

It only specifies that the default camera for player will be the camera provided on the Scene. We will leave it that way and continue with our initialization.

What happens here? First we create TextureRenderTarget2D, which basically means that we initialize the stream on Spout. Next we set the TextureTarget on CaptureComponent2D of SceneCapture2D1 to this TextureRenderTarget2D so it knows where to transfer the generated texture. After that we set the TextureRendererTarget2D variable on SpoutSenderActor so it can use it to generate the frame. Finally we set the SendTextureFrom on SpoutSenderActor to TextureRenderTarget2D so it knows that he needs to use it and we change the stream State to Checked (which means that it should generate frames).
That’s it!
Our SpoutSender configuration is ready. We can test if it works using Spout SDK Demo Receiver. Go to Spout installation directory (it should be located in Program Files (x86)). Go to folder DEMO and run SpoutReceiver.exe. Now click Play in the Unreal Editor and watch magic happens:

Puzzle template allows to change color of blocks when clicked on. Try it. It will change in Spout Receiver instantly.
Note Unreal Engine 4 is optimized for performance wherever it can, so when game goes into background it loses FPS. To prevent this behavior go to Edit -> Editor Preferences, Miscellaneous and uncheck "Use Less CPU when in Background"A similar problem occurs with sound - it is not playing when losing focus. To enable it open DefaultEngine.ini from Config folder of your project and add [Audio] UnfocusedVolumeMultiplier=1.0
If everything works we can go to GrandVJ XT configuration.
GrandVJ XT configuration
When running GrandVJ it will ask for the license key. Please just select Try GrandVJ XT for the purpose of this tutorial.
Next select New… on the What would you like to do ? dialog and select Blank template – Mixer mode in the next dialog.
Now go to Sources tab, scroll to the top and select Spout Cam. If the SpoutPuzzleTest project is playing you should see the preview (if not, this is the time to let it run!).
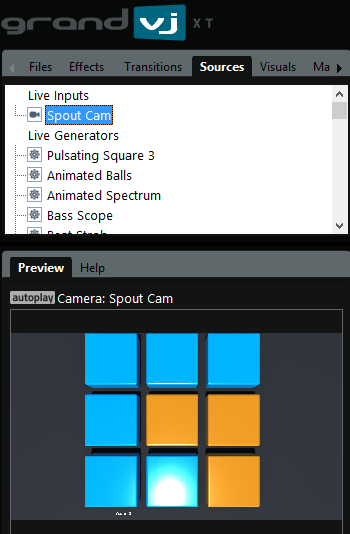
Now drag the Spout Cam source onto the mixer Layers 8th channel. You should see the out stream in the Master Preview. Now click the Open Video Mapper button on the top.

GrandVJ XT video mapper setup
What you see in the Video Mapper depends on your system’s video configuration. You should see every video device that is plugged into your video card. If there are projectors you can start your mapping. If not, let us just test it with a monitor. In my configuration there are 2 monitors. To view our stream just pick the rectangle symbol on one of them.
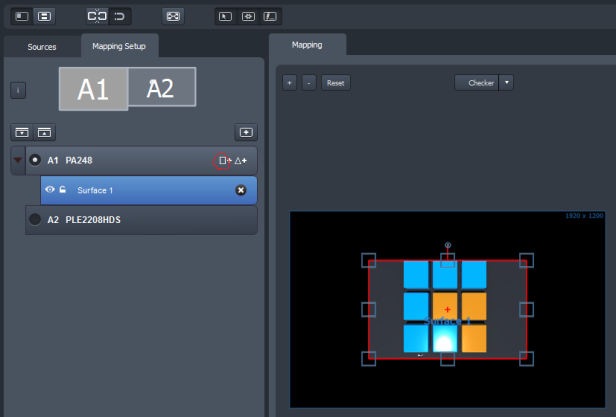
To start video mapping press CTRL+F (for Fullscreen).
Note
Remember the CTRL+F combination. This is the only way to go back to desktop as
GrandVJ XT takes control of your monitor.
That’s all!
Summary
The process of combining game engine with video mapping software can be cumbersome, but Spout is a very versatile and considerably easy to use software to combine various technologies on either side. Spout can be used in numerous ways, e.g. as a Winamp and Virtual DJ visualization source, to name a few. Unreal Engine 4 and Grand VJ XT can be substituted with any software that supports Spout (which should be a standard for video mapping purpose, if you ask me), e.g. Unity3D and Resolume Arena.
Next step
Please let me know if you would like me to write posts about going deeper into related topics such as:
Video Mapping configuration
The video mapping is a complex problem. You need to place projectors correctly, plan how does your resources (projectors) can be used to create best effect, finally to transform the view on each of them properly considering compensating trapeze effect and linear stretching of the view.
Game Engine inputs for video mapping
Using game engine as a source of video mapping gives as a massive opportunity for creating novel gaming experiences. The biggest problem is potentially player input. Player needs a controller to join the game, which without it is just an animation. Gesture tracking controllers are the most immersive, so the user feels as he would be in the game. One of the most advanced (and accessible) devices is Microsoft Kinect v 2.0. Utilization of Kinect and video mapping can result in experience similar to Virtual Reality Helmets like Oculus Rift, HTC Vive and more, but without the additional equipment on the head and in the hands of user.

Hey Zimadev,
Thanks so much for this tutorial, very well written and helped a ton. One issue I ran into was that the demo version of Grand VJ XT didn’t have the little mapping icon above the Master Preview section, so a little stumped on how to integrate the output into the Grand VJ Mapper software (which I also have). I’ll try this with Resolume Arena and see how it goes.
Cheers
LikeLike
Hi! Glad to hear that it helped you. Are you sure that you’ve downloaded the XT version and further clicked the Try Grand VJ XT?
LikeLike
I did indeed. Even in the downloaded readme/documentation it shows that the mapping icon should be there, however it isn’t present in the Grand VJ XT GUI of the demo version which I downloaded. I’ll try to reinstall it again and figure it out from there.
LikeLike
“What happens here? First we create TextureRenderTarget2D, which basically means that we initialize the stream on Spout. Next we set the TextureTarget on CaptureComponent2D of SceneCapture2D1 to this TextureRenderTarget2D so it knows where to transfer the generated texture. After that we set the TextureRendererTarget2D variable on SpoutSenderActor so it can use it to generate the frame. Finally we set the SendTextureFrom on SpoutSenderActor to TextureRenderTarget2D so it knows that he needs to use it and we change the stream State to Checked (which means that it should generate frames).
That’s it!”
Could you please explain how do this part in better detail.. I am having a lot of trouble trying to “Set” all these values
Any help would be appreciated.
LikeLike
Hey! Remember that you can download the project from https://www.dropbox.com/s/4gtdqkbodgcwmkv/SpoutPuzzleTest.zip?dl=0
LikeLike
Wow this is great, haven’t had the chance to try this but I surely will in the near future!
Thank you very much for what you are doing, I really hope you will explore the other topics you mentioned
LikeLike
Working on projection mapping cube for interactive escape room game (Graduate Thesis Project) utilizing K4U plugin (KinectInterfaceComponent) in UE4 and would like to Spout out. However, K4U source code not available so need Blueprint only project.
The setup says start a C++ because may need it later.
Q1: Does the Spout plugin have to be created in a C++ environment? — K4U won’t work in C++ UE4 Project.
Q2: If not, is their a workaround? I am seeing posts on taking C++ back to Blueprint, but will this remove the spout functionality?
LikeLike
Hey! This solution is clearly Blueprint based so don’t worry. I’ve wrote to use C++ project so it is easier to move on with one’s custom functionality.
LikeLike
Thank YOU!!! I have been debugging a workaround for 3 days until I reread your post, and saw the note on ‘C++ for later use’!
Kudos to you, original post and your prompt reply.
LikeLike
Hey Zimadev,
Thanks for the tutorial, i have also managed to get the spout sender functioning, but not the receiver part. I was wondering if you had any luck with that ?
Thanks.
LikeLike
Hi. Here you can find images for configuring SpoutReceiver:
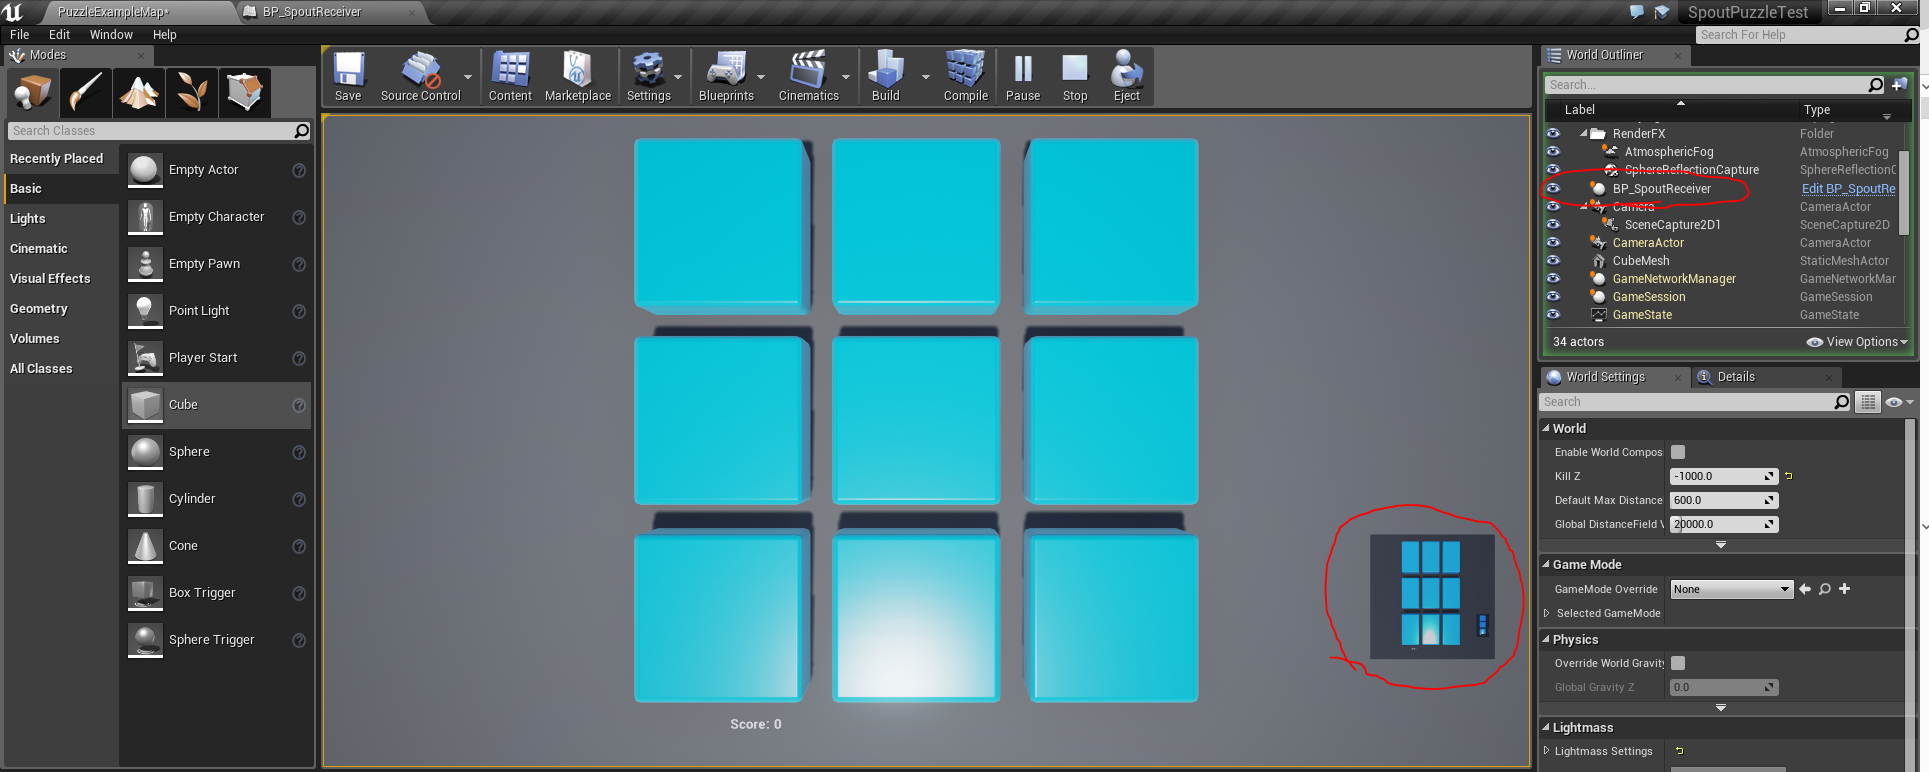
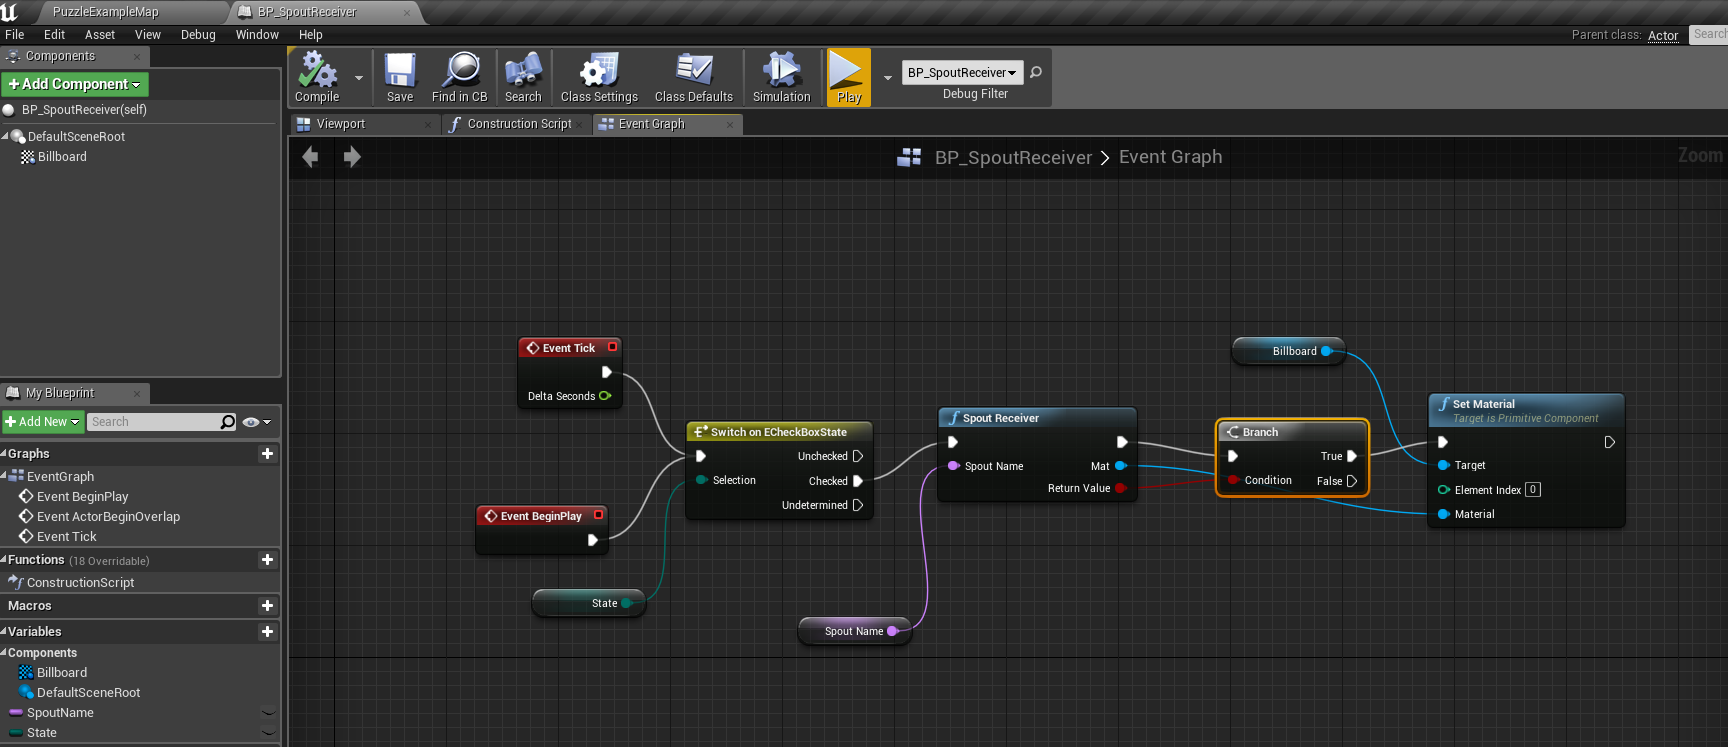
In general you need to create another actor called BP_SpoutReceiver with MaterialBillboard component. Next on every tick obtain a frame from SpoutSender with defined name (SpoutSenderTest) and set is a material for the Billboard (remember to create Sprite element on index 0). Later put BP_SpoutReceiver instance on the map and place in in front of the camera. There is alsa a State variable that you need to connect after initialization in LevelBlueprint. Tell me if you need more specific help. Cheers!
LikeLike
Zimaxxx,
The Thesis Project that I asked about in a previous post (UE4 with Kinect, Spout to D3) is up and running with four players in a projection mapped cube. See my FB (Clint Sawin) for some pics.
However, we are taking part in SXSW Showcase and we have run into resolution issues that we need to resolve.
When playing in viewport in engine our resolution is perfect, but when we Spout the Receiver is removing anti-aliasing.
Do you know how to fix this? Our team was working on this and all the sudden after restart our resolution in Spout was perfect (anti-aliased) and projected. So we have proof of concept with regards to resolution.
Problem is team member is unsure exactly what parameters were changed bc restart was caused by infamous UE4 crash.
Any help would be appreciated.
LikeLike
Hey. I’m really looking forward too see your work! As to your problem, I doubt that this problem is Spout related. I think it’s about SceneCapture2D and the Texture gathering process. It could also be bug in the Engine 😉 You can try to find other technologies utilizing SceneComponent2D and see if the problem persists. Good luck!
LikeLike
Hello,
More than a year later, but did you manage to make the plugin work in a packaged game?
Thanks!
Mitja
LikeLike
Hello. To be honest I didn’t try that, but I probably will in the following months!
LikeLike
Managed to make it work, but you need to manually copy spout.dll to a different folder.
I’ve posted more detailed instructions on the forked repository.
https://github.com/lightact/Spout-UE4
LikeLiked by 1 person
Hello, this is a great tutorial got it work easy. But how can I setup more than one sender? I want six for my project. Any tips would be appriciated.
LikeLike
Setup of several senders should be easy to achieve, but the problem is on the receiver side. I didn’t manage to make GrandVJ XT work with more than 1 SPOUT source. I am to tackle that problem in the following months so stay tuned!
LikeLike
Thanks for the reply, I’m using Touchdesigner to recieve, which has native support for spout, so that easy for me, I just can’t send from UE4! Any ideas?
LikeLike
Possibly replicate the about Sender BP for each sender? With a unique name for each sender?
LikeLike
about = above*
LikeLike
Got working, not to hard!
LikeLike
In Lightact media server, we’ve enabled integration with Unreal Engine. In short, what it allows you to do is to share textures and variables between Lightact and UE. I would be very happy if some of you guys can give it a spin and let us know how can we improve it.
I have to say this post was really helpful when we started working on it, so thank you Zimaxx very much.
You can download it here:
https://lightact-systems.com/product/lightact-latest/
There is a sample project as well, which you can download here:
https://lightact-systems.com/product/unreal-engine-integration/
And a bunch of video tutorials here:
Thanks!
LikeLike
Hey!
I’m glad it helped you guys. Very neat tutorials too. Please tell me – can Lightact by used instead of GrandVJ XT for multiprojector videomapping? I’m looking for an alternative.
Cheers!
LikeLike
Hi,
I am glad you liked the tutorials.
Lightact can certainly be used for multiprojector videomapping. You can check out the workflow here:
https://support.lightact-systems.com/projection-mapping/
(no video tuts on this subject yet, sorry – they will be coming a bit later)
That being said, personally, I still think we need to add a few features, which is going to happen in the next few months. Once we get there, I would be happy to start a discussion on what else can we improve.
Cheers,
Mitja
LikeLike
Hi zimaxxx,
Like I mentioned in April, we have upgraded projection mapping significantly. You can check out all the new features in 2D projection mapping workflow here:
LikeLike
Thanks for the tutorial!! It does a great help for me !!
But one thing stop me is when I following your way to create a C++ project, It works!The plugin showed up. But when I tried on my existing blueprint project, a window coming up saying,
“Binaries for the ‘Spout Plugin’ are missing or incompatible with the current engine version.Would you like to disable it ?You will no longer be able to open assets that were created with it.”
Btw , They are all in UE4.19 version ,How can I do with it ?PLz, help me!!
LikeLike
Hey. Make sure that you have Spout.dll and Spout.lib in Binaries/Win64 folder. If that doesn’t help please send me logs from Saved/Logs folder
LikeLike